
When writing long blog articles, especially guides, tutorials, or in-depth reviews, a Table of Contents (TOC) can significantly improve the reading experience. It allows visitors to quickly navigate the page and jump directly to the sections that interest them most.

However, many WordPress users encounter a limitation: the Table of Contents widget in Elementor is only available in Elementor Pro, while most third-party TOC plugins add unnecessary weight to the website.
The good news is that there is a simple, lightweight alternative. By using a small HTML widget and a short JavaScript script, you can automatically generate a Table of Contents from your article headings without installing any plugin.
In this guide, you will learn how to create a fully automatic Table of Contents in Elementor, using a clean and efficient solution that works perfectly even with the free version of Elementor.
Table of Contents
Why a Table of Contents Improves SEO and Readability
A Table of Contents is not only useful for readers; it can also contribute to better user engagement and search engine optimization.
When articles are long and structured with multiple sections, a TOC helps users quickly identify the content they need. Instead of scrolling through hundreds or thousands of words, they can simply click on the section title and jump directly to the relevant part of the page.
This leads to several advantages:
-
Improved user experience because visitors can navigate the article easily
-
Lower bounce rate, as readers are more likely to stay on the page
-
Better readability, especially for guides and tutorials
-
Clearer content structure, which search engines can understand more easily
In some cases, search engines may even use structured headings to generate additional navigation links in search results, making the article more visible.
For these reasons, a Table of Contents is often considered a best practice for long-form content.
The Problem with Most Table of Contents Plugins
Many WordPress plugins offer Table of Contents functionality, but they often come with several drawbacks.
Some plugins load additional stylesheets, scripts, and configuration panels that can slow down the website. Others introduce unnecessary complexity by adding multiple layout options, animations, or database queries that are not always needed.
Common issues include:
-
increased page loading time
-
additional plugin maintenance
-
compatibility conflicts with themes or builders
-
limited control over the generated structure
Another limitation is that Elementor’s built-in TOC widget requires Elementor Pro, which may not always be necessary if you only need a simple navigation system.
Because of this, many developers and bloggers prefer lightweight custom solutions.
A Lightweight Solution Using an HTML Widget
Instead of relying on plugins, you can create an automatic Table of Contents using three simple components:
-
an HTML widget in Elementor
-
a small CSS style block
-
a short JavaScript script
The script scans the article content, detects headings such as H2 and H3, and automatically generates a structured list of links.
Each item in the list links directly to the corresponding section of the article. If a heading does not already have an ID, the script automatically creates one.
The result is a fully automatic Table of Contents that updates itself whenever you add or modify headings in your article.
Step 1 – Add an HTML Widget in Elementor
First, open your blog post in Elementor.
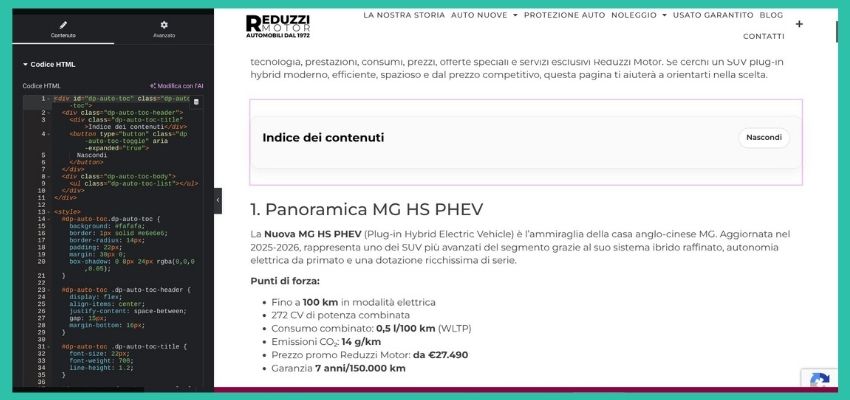
Inside the page layout, add an HTML widget in the position where you want the Table of Contents to appear. This is usually near the beginning of the article, just after the introduction.
The HTML widget allows you to insert custom code that Elementor will render on the page.
Once the widget is added, you are ready to insert the script.
Step 2 – Paste the Table of Contents Code
Inside the HTML widget, paste the complete code that generates the Table of Contents. This code contains the structure, styling, and JavaScript logic required to scan the headings and create the navigation list automatically.
The script will:
-
search the article for H2 and H3 headings
-
generate anchor links automatically
-
build a hierarchical list
-
enable smooth scrolling
-
hide the TOC if no headings are found
Because everything runs directly in the browser, no additional plugins or backend configuration are required.
Step 3 – Publish the Page
After pasting the code, simply publish or update the page.
When the article loads, the script will automatically analyze the page content and generate the Table of Contents based on the headings it finds.
If you later add or modify headings in the article, the Table of Contents will update automatically without any additional work.
This makes the solution very convenient for bloggers who frequently update or expand their content.
How the Script Works
Although the code runs automatically, understanding its basic logic can be useful if you want to customize it.
The script begins by scanning the article container and searching for H2 and H3 headings. These headings typically represent the main sections and subsections of an article.
For each heading found, the script performs several operations:
First, it checks whether the heading already has an ID attribute. If it does not, the script generates a unique ID based on the heading text.
Next, it creates a corresponding link element that points to that ID.
Finally, it organizes the links into a structured list where:
-
H2 headings become main items
-
H3 headings appear as nested subsections
This hierarchical structure makes the Table of Contents easy to read and visually aligned with the structure of the article.
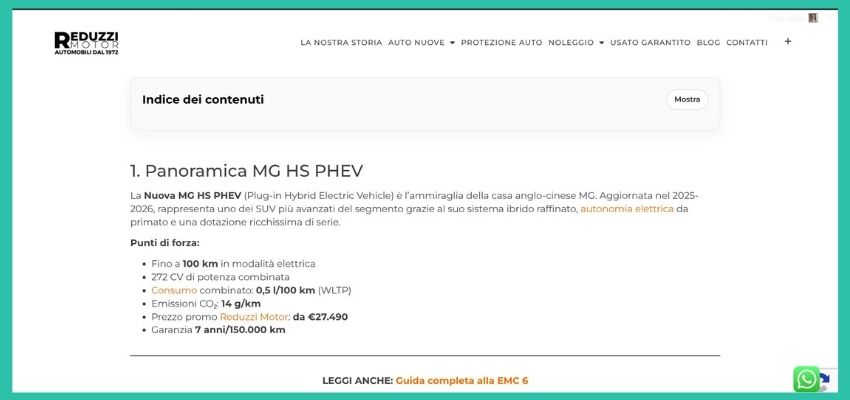
The script also includes a small toggle button that allows readers to show or hide the Table of Contents, keeping the page layout clean.
Customizing the Table of Contents
One advantage of using a custom script is that it can easily be adapted to different needs.
For example, you can modify the script to change which headings are included. If you prefer to display only main sections, you can configure the script to scan only H2 headings.
You can also adjust the design by modifying the CSS styles. Colors, spacing, borders, and fonts can all be changed to match the style of your website.
Another useful option is the ability to exclude certain sections from the Table of Contents. For example, some bloggers prefer not to include sections like FAQ or Conclusion.
This can be done by defining a small list of excluded titles that the script will ignore when building the navigation.
Because everything is written in standard HTML, CSS, and JavaScript, the script can easily be customized even by users with basic coding knowledge.

Advantages of This Approach
Compared with traditional plugin solutions, this method offers several advantages.
First, it is extremely lightweight. The entire script is embedded directly in the page, meaning it does not require additional plugins or external resources.
Second, it offers full control over the output. You can adjust the structure, appearance, and behavior exactly as you prefer.
Third, it improves site performance by avoiding unnecessary plugin overhead.
Finally, it works perfectly with Elementor Free, making it accessible to bloggers who do not need the advanced features of Elementor Pro.
For many websites, this simple solution is more than enough to create a clean and effective Table of Contents.
Final Thoughts
Adding a Table of Contents to your blog articles is a simple improvement that can significantly enhance readability and navigation.
For Elementor users, the lack of a built-in TOC widget in the free version often leads to installing additional plugins. However, as this guide shows, it is possible to achieve the same result using a lightweight custom solution.
With just a small HTML widget and a short script, you can automatically generate a dynamic Table of Contents that updates itself whenever your headings change.
This approach keeps your website faster, cleaner, and easier to maintain while still providing readers with a professional navigation system.
If you frequently publish long tutorials, guides, or technical articles, implementing a Table of Contents can be a simple yet powerful way to improve both user experience and content structure.

Digital Designer, blog writer and also a tech enthusiast.
He loves to write content for blogs, podcasts, design websites, logos, brochures, banners and anything that sends a message to an audience.
You can contact Daniele at the link below:


