

If you asked yourself: can I make a Make a WordPress no index plugin to add “no-index / no follow” to selected pages?

The answer is yes. It is possible to create a WordPress plugin that adds the “no-index” and “no-follow” tags to selected pages.
Here is an outline of how you could do it:
Table of Contents
Make a WordPress no index plugin – Get your folder and files ready
- Create a new plugin folder and files. (if this is your first time see below for a quick how to set-up your plugin folder and files, if not, you can skip to point #2)
- a Create a new folder in the wp-content/plugins directory of your WordPress installation, and name it something like “addnoindex“.
- b Inside the folder, create a new file called “addnoindex.php“. This file will contain the code for your plugin.
- c-In the plugin file, add the following header information at the top:
- b Inside the folder, create a new file called “addnoindex.php“. This file will contain the code for your plugin.
- a Create a new folder in the wp-content/plugins directory of your WordPress installation, and name it something like “addnoindex“.
<?php

/*
Plugin Name: Addnoindex
Plugin URI:
Description: This plugin adds a "no-index" / "no-follow" option to the pages editing screen in the WordPress admin.
Version: 1.0
Author: Your Name
Author URI:
License: GPL2
*/
Make a WordPress no index plugin – Create the checkbox for page and posts
- Add a checkbox to the page editing screen in the WordPress admin area (below is explained how you can add a checkbox to the page editing screen in the WordPress admin area)
- a To add a checkbox to the page editing screen in the WordPress admin area, you can use the add_meta_box function. Here is an example of how you can use the add_meta_box function to add a checkbox to the page editing screen:
<?php

function my_add_noindex_nofollow_checkbox() {
add_meta_box(
'my_noindex_nofollow_checkbox', // ID
'Noindex Nofollow', // Title
'my_noindex_nofollow_checkbox_html', // Callback function
'page', // Post type
'side' // Context
);
}
add_action('add_meta_boxes', 'my_add_noindex_nofollow_checkbox');

function my_noindex_nofollow_checkbox_html($post) {
$value = get_post_meta($post->ID, 'my_noindex_nofollow_checkbox', true);
?>
<label for="my_noindex_nofollow_checkbox">
<input type="checkbox" name="my_noindex_nofollow_checkbox" id="my_noindex_nofollow_checkbox" value="1" <?php checked($value, 1); ?> />
Add "no-index" and "no-follow" tags to this page
</label>
<?php
}
This code will add a checkbox to the page editing screen in the WordPress admin area. When the checkbox is checked, the “no-index” and “no-follow” tags will be added to the page head section when the page is displayed.
-
- b To save the checkbox value when the page is updated, you can use the save_post action hook.
Here is an example of how you can use the save_post hook to save the checkbox value when the page is updated:
<?php

function my_save_noindex_nofollow_checkbox($post_id) {
// Check if the checkbox is checked
if (isset($_POST['my_noindex_nofollow_checkbox'])) {
update_post_meta(
$post_id,
'my_noindex_nofollow_checkbox',
1
);
} else {
update_post_meta(
$post_id,
'my_noindex_nofollow_checkbox',
0
);
}
}
add_action('save_post', 'my_save_noindex_nofollow_checkbox');
This code will save the checkbox value when the page is updated. If the checkbox is checked, the value will be saved as 1. If the checkbox is not checked, the value will be saved as 0.
Make a WordPress no index plugin – Add the tags to the page head section
- When the checkbox is checked, add the “no-index” and “no-follow” tags to the page head section.
To add the tags to the page head section, you can use the wp_head action hook, which allows you to insert code into the head section of pages in WordPress.
Here is an example of how you could use the wp_head hook to add the “no-index” and “no-follow” tags to the page head section when the checkbox is checked:
<?php

function my_noindex_nofollow_tags() {
if (is_page()) {
// Check if the checkbox is checked
$noindex_nofollow = get_post_meta(get_the_ID(), 'my_noindex_nofollow_checkbox', true);
if ($noindex_nofollow) {
// Add the "no-index" and "no-follow" tags
echo '<meta name="robots" content="noindex,nofollow" />';
}
}
}
add_action('wp_head', 'my_noindex_nofollow_tags');
This code will add the “no-index” and “no-follow” tags to the head section of pages where the checkbox is checked.
Make a WordPress no index plugin – Final results
That’s it, here is a how your final output should be for the “addnoindex.php” file:
<?php


/*
Plugin Name: Addnoindex
Plugin URI:
Description: This plugin adds a "no-index" / "no-follow" option to the pages editing screen in the wordpress admin.
Version: 1.0
Author: Your Name
Author URI:
License: GPL2
*/

function my_noindex_nofollow_tags() {
if (is_page()) {
// Check if the checkbox is checked
$noindex_nofollow = get_post_meta(get_the_ID(), 'my_noindex_nofollow_checkbox', true);
if ($noindex_nofollow) {
// Add the "no-index" and "no-follow" tags
echo '<meta name="robots" content="noindex,nofollow" />';
}
}
}
add_action('wp_head', 'my_noindex_nofollow_tags');

/* add metabox to select the options on WP admin */

function my_add_noindex_nofollow_checkbox() {
add_meta_box(
'my_noindex_nofollow_checkbox', // ID
'Noindex Nofollow', // Title
'my_noindex_nofollow_checkbox_html', // Callback function
'page', // Post type
'side' // Context
);
}
add_action('add_meta_boxes', 'my_add_noindex_nofollow_checkbox');

function my_noindex_nofollow_checkbox_html($post) {
$value = get_post_meta($post->ID, 'my_noindex_nofollow_checkbox', true);
?>
<label for="my_noindex_nofollow_checkbox">
<input type="checkbox" name="my_noindex_nofollow_checkbox" id="my_noindex_nofollow_checkbox" value="1" <?php checked($value, 1); ?> />
Add "no-index" and "no-follow" tags to this page
</label>
<?php
}


/* save the checkbox value when the page is updated*/

function my_save_noindex_nofollow_checkbox($post_id) {
// Check if the checkbox is checked
if (isset($_POST['my_noindex_nofollow_checkbox'])) {
update_post_meta(
$post_id,
'my_noindex_nofollow_checkbox',
1
);
} else {
update_post_meta(
$post_id,
'my_noindex_nofollow_checkbox',
0
);
}
}
add_action('save_post', 'my_save_noindex_nofollow_checkbox');
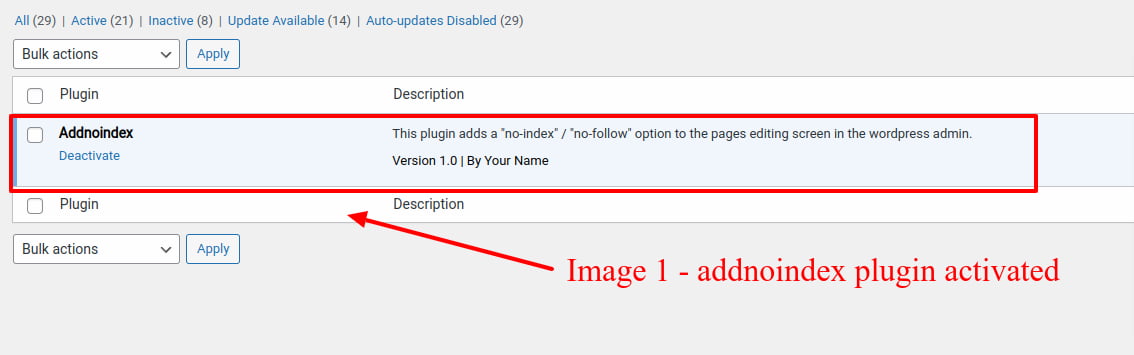
The plugin view in the WordPress admin back-end
Here is your new plugin activated in the WordPress back-end
The settings in the pages and posts
Here is the checkbox option in the WP admin when editing the page

The tags in the HTML code output
And here you can see the tags applied in the html of the page

Remember also that sometimes things do not work out of the box, you might have made typo while writing the code or else there could be a conflict with another plugin. In any case, whenever you have a problem with custom code on WordPress you might get an error of some kind that might even prevent the site to load (white screen of death). Do not worry, if that happens here is what you can do:
Troubleshooting a WordPress error while custom coding your WordPress plugin
If you encounter an error while custom coding a plugin or page on WordPress and it renders the site unavailable, you can follow these steps to resolve the issue:
-
Access your site’s files through FTP or cPanel file manager to locate and edit the problematic plugin or page file.
-
Deactivate the plugin causing the error by renaming its folder in the “wp-content/plugins” directory.
-
If the error persists, you can try to access the site through the WordPress recovery mode by adding the following line to your wp-config.php file: define( ‘WP_RECOVERY_MODE’, true );
-
If the recovery mode is successful, you can deactivate the plugin causing the issue from the WordPress dashboard and resolve the error by fixing the code.
-
If you still can’t access the site, you can restore the site from a backup.
Note: Always make sure to backup your site before making any customizations or changes to your WordPress site.
That’s it for this mini tutorial, enjoy your new plugin and custom features for your WordPress website. Please remember to try this hacks on a staging site and not on a live production website, even better if you build it on top of a localhost installation that is much aster and easier to install a plugin just by pasting the folder into the plugin directory.

Digital Designer, blog writer and also a tech enthusiast.
He loves to write content for blogs, podcasts, design websites, logos, brochures, banners and anything that sends a message to an audience.
You can contact Daniele at the link below:


