


Hello and welcome back to another of our DIY Tutorials for Chrome extension. Today, we will be creating a Chrome extension for a World Time Clock. This tutorial consists of several quick and easy steps. We’ll begin by creating the main JSON, HTML and JavaScript files inside the structure of a Chrome extension. Then, we’ll guide you through the process of creating the necessary image files for the extension, such as the 6×16, 48×48, and 128×128 pixels icons, which, together with the JSON, HTML and JS files are essential for Chrome to recognize and load your extension. Right, let’s dive in!
Table of Contents
1. Organize Extension Files
First, let’s organize your files. Your extension folder will contain:
world-time.js(Code below)world-time.html(Code below)manifest.json(Code below)
2. Create the Manifest File
Chrome extensions require a manifest.json file. This file tells Chrome about your extension, its version, and what it needs to run. Here’s an example of what your manifest.json might look like:
{
“manifest_version”: 3,
“name”: “World Time Clock”,
“version”: “1.0”,
“description”: “Display the world time for various time zones.”,
“permissions”: [
“activeTab”
],
“action”: {
“default_popup”: “world-time.html”,
“default_icon”: {
“16”: “images/icon16.png”,
“48”: “images/icon48.png”,
“128”: “images/icon128.png”
}
},
“icons”: {
“16”: “images/icon16.png”,
“48”: “images/icon48.png”,
“128”: “images/icon128.png”
}
}
3. HTML and JavaScript Files for World Time Clock Extension
To create the World Time Clock Chrome extension, you’ll need two main files: an HTML file (world-time.html) and a JavaScript file (world-time.js). These files work together to display the current time in various time zones selected by the user. Here’s how to set up and understand each file.
3.1. HTML File (world-time.html)
The HTML file provides the structure of your extension’s user interface. It includes a dropdown menu for selecting a time zone and a display area for the clock. Below is the content of world-time.html:
<!DOCTYPE html>
<html lang=”en”>
<head>
<meta charset=”UTF-8″>
<title>World Time Clock</title>
<meta name=”viewport” content=”width=device-width, initial-scale=1.0″>
</head>
<body>
<table border=”0″ width=”120″ cellspacing=”0″ cellpadding=”3″>
<form name=”where”>
<tr>
<td width=”100%”>
<select name=”city” size=”1″>
<option value=”” selected>Local time</option>
<option value=”0″>London GMT</option>
<option value=”2″>Rome</option>
<option value=”2″>Cairo</option>
<option value=”3″>Moscow</option>
<option value=”4″>Dubai</option>
<option value=”7″>Bangkok</option>
<option value=”8″>Hong Kong</option>
<option value=”9″>Tokyo</option>
<option value=”11″>Sydney</option>
<option value=”11″>Melbourne</option>
<option value=”12″>Fiji</option>
<option value=”13″>New Zealand</option>
<option value=”-10″>Hawaii</option>
<option value=”-8″>San Francisco</option>
<option value=”-4″>New York</option>
<option value=”-3″>Rio De Janeiro</option>
</select>
</td>
</tr>
<tr>
<td width=”100%”>
<span id=”hours” style=”font:bold 16px Arial;”>00</span>:<span id=”minutes” style=”font:bold 16px Arial;”>00</span>:<span id=”seconds” style=”font:bold 16px Arial;”>00</span> <span id=”ampm” style=”font:bold 16px Arial;”>AM</span>
</td>
</tr>
</form>
</table>
<script src=”world-time.js”></script>
</body>
</html>
This file sets up a simple interface with a dropdown menu for the user to select a time zone. When a time zone is selected, the JavaScript code will update the worldclock span with the current time in the selected zone.
3.2. JavaScript File (world-time.js)
The JavaScript file contains the logic to calculate the current time based on the selected time zone and update the display accordingly. Here’s an overview of world-time.js:
document.addEventListener(‘DOMContentLoaded’, function() {
const selectElement = document.querySelector(‘select[name=”city”]’);
selectElement.addEventListener(‘change’, updateClock);
setInterval(updateClock, 1000); // Update the clock every second
updateClock(); // Initial update on load
});
function getZoneOffset() {
const selectElement = document.querySelector(‘select[name=”city”]’);
// If the selected option value is an empty string (”), consider it as local time
const value = selectElement.value;
if (value === ”) {
return null; // Indicate local time without offset
}
return parseInt(value, 10);
}
function formatTimeValue(value) {
return value < 10 ? `0${value}` : value.toString();
}
function updateClock() {
const zoneOffset = getZoneOffset();
let targetTime;
if (zoneOffset !== null) {
// Time zone offset is defined, calculate target time based on offset
const now = new Date();
targetTime = new Date(now.getTime() + now.getTimezoneOffset() * 60000 + zoneOffset * 3600000);
} else {
// Zone offset is null, indicating local time should be used
targetTime = new Date();
}
let hours = targetTime.getHours();
const minutes = formatTimeValue(targetTime.getMinutes());
const seconds = formatTimeValue(targetTime.getSeconds());
const ampm = hours >= 12 ? ‘PM’ : ‘AM’;
hours = hours % 12;
hours = hours ? hours : 12; // The hour ‘0’ should be ’12’
document.getElementById(‘hours’).textContent = formatTimeValue(hours);
document.getElementById(‘minutes’).textContent = minutes;
document.getElementById(‘seconds’).textContent = seconds;
document.getElementById(‘ampm’).textContent = ampm;
}
4. Add an Icon
Create an icon for your extension and place it in an images folder within your extension directory. You need to create or find icons in three sizes: 16×16, 48×48, and 128×128 pixels. Reference these icons in your manifest.json.
Here are mine for reference:


5. Loading the Extension
- Open Chrome and navigate to
chrome://extensions/. - Enable “Developer mode” at the top right.
- Click “Load unpacked” and select the directory where your extension files are located.
6. Debugging
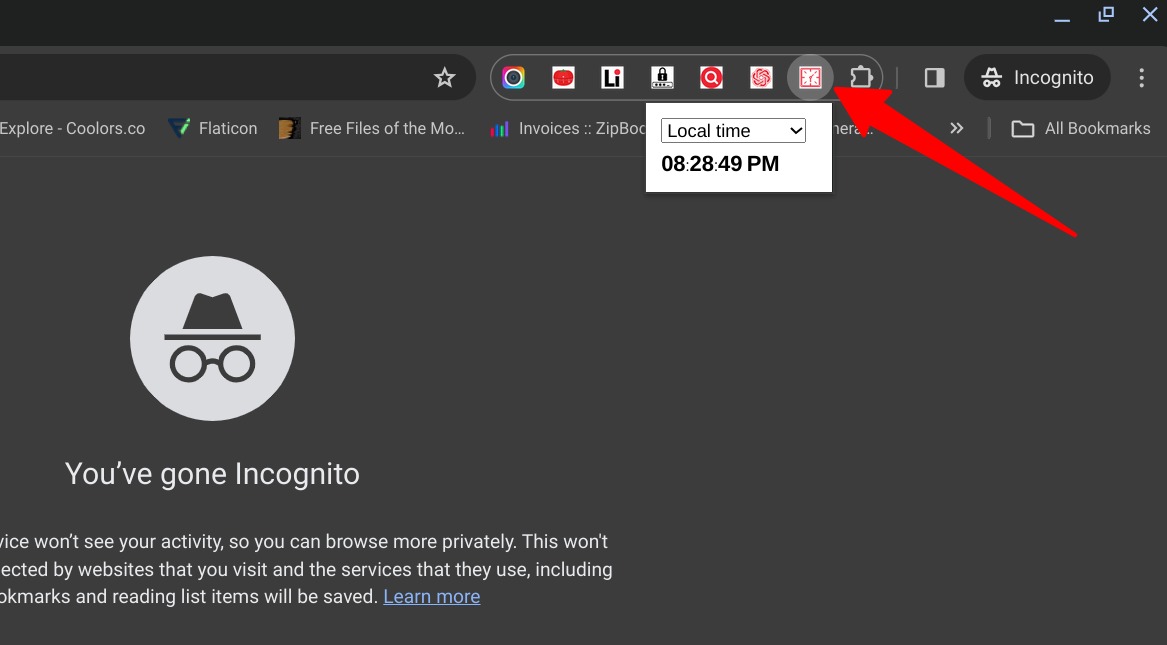
After loading your extension, click on the extension icon to test it. If it doesn’t work as expected, you can debug it by right-clicking on the popup and selecting “Inspect”. The Chrome Developer Tools will open, where you can debug your HTML and JavaScript.
Conclusion
That’s the basic process to turn your world time clock into a Chrome extension. This setup assumes you want a popup style extension that shows your world time clock when you click the extension icon. If you have different requirements (e.g., content scripts, background scripts, or additional permissions), the setup might vary.

Digital Designer, blog writer and also a tech enthusiast.
He loves to write content for blogs, podcasts, design websites, logos, brochures, banners and anything that sends a message to an audience.
You can contact Daniele at the link below:


