

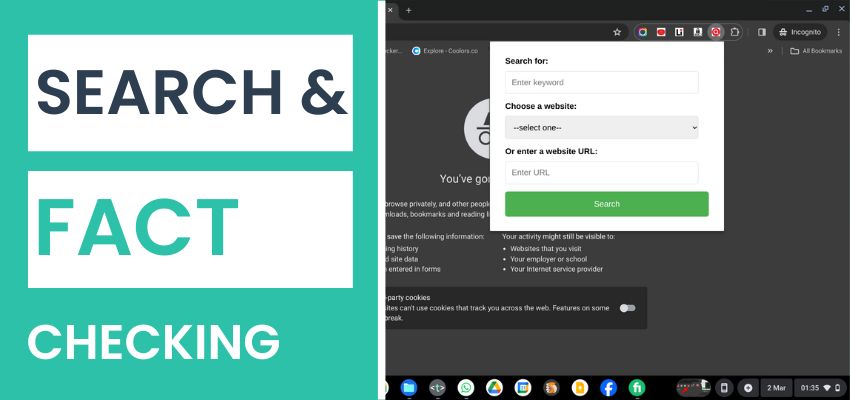
In the fast-paced world of content creation, professional writers are constantly seeking ways to streamline their research process and enhance productivity. The abundance of information available online is both a blessing and a challenge, necessitating tools that can sift through the digital noise to find relevant, authoritative sources quickly. Recognizing this need, “Crafting a Web Search Tool for Professional Writers” introduces a bespoke solution tailored to the unique demands of writing professionals.
By leveraging the power of customized search extensions, writers can significantly reduce the time spent on research, ensuring that every minute is dedicated to crafting compelling narratives. This tutorial not only guides you through creating a personalized Google Chrome extension but also highlights the profound impact such productivity tools have on the quality and efficiency of writing in the digital age.
Creating a Chrome extension can be an exciting project, offering a practical way to learn to code and understand how web technologies work together. Below is a step-by-step tutorial on creating a Google Chrome Extension, like this site-specific search tool we’re going to discuss today. But first, let’s see what’s the ideal use scenario for such a tool.

Table of Contents
The Purpose
As someone deeply invested in the digital realm, I’ve found immense value in creating a Chrome extension tailored to enhance my online research and content creation workflow. Specifically, I use this extension to conduct site-specific searches across various authoritative websites, enabling me to fact-check data efficiently and discover credible links to enrich my blog articles.
The beauty of this tool lies in its adaptability; while I’ve curated a selection of websites that I frequent, this tutorial empowers you, the reader, to craft a personalized extension featuring your most-used links. This customization not only streamlines your search process by eliminating the need to manually type URLs but also offers the flexibility to explore beyond the preset options through a dedicated input field.
Whether you’re verifying information or seeking reputable sources, this extension stands as a testament to the win-win advantages of tailored technology solutions.
Now, enough with the talks. Let’s get on with it!
Building the Google Chrome Extension
Step 1: Set Up Your Project Directory
- Create a New Folder for your extension project. Name it something descriptive, like
SiteSearchExtension. - Inside this folder, you’ll create several files:
manifest.json: The metadata file.index.html: The user interface.style.css: The styling for your UI.script.js: The functionality of your extension.
Step 2: Create the Manifest File
- In your project directory, create a file named
manifest.json. - Paste the following code into
manifest.json:
{

  "manifest_version": 3,

  "name": "Site Specific Search",

  "version": "1.0",

  "description": "Perform a Google site-specific search directly from your browser.",

  "permissions": ["activeTab"],

  "action": {

    "default_popup": "index.html",

    "default_icon": {

      "16": "images/icon16.png",

      "48": "images/icon48.png",

      "128": "images/icon128.png"

    }

  },

  "icons": {

    "16": "images/icon16.png",

    "48": "images/icon48.png",

    "128": "images/icon128.png"

  }

}
Note: You will need to create the icons mentioned in the manifest.json or update the paths to match your icons.
Step 3: Create the HTML File
- Create an
index.htmlfile in the same directory. - Below is the HTML code you’ll need to paste into it. Feel free to change the option links to the one of the websites you mostly use for searching your content.
<!DOCTYPE html>

<html lang="en">

<head>

    <meta charset="UTF-8">

    <meta name="viewport" content="width=device-width, initial-scale=1.0">

    <title>Site Specific Search Form with Google Results</title>

    <link rel="stylesheet" href="style.css">

</head>

<body>

    <form id="searchForm">

        <label for="keyword">Search for:</label>

        <input type="text" id="keyword" name="keyword" placeholder="Enter keyword">
        <label for="websiteSelect">Choose a website:</label>

        <select id="websiteSelect" name="website">

            <option value="default">--select one--</option>

            <!-- Options go here -->

               <option value="default">--select one--</option>

            <option value="https://www.cbsnews.com/">CBS NEWS</option>

            <option value="https://www.sfgate.com/">SF Gate (San Francisco)</option>

            <option value="https://www.thedailybeast.com/">The Daily Beast (New York)</option>

            <option value="https://www.newsweek.com/">NewsWeek (New York)</option>

            <option value="https://www.theatlantic.com/">The Atlantic (Washington, D.C.)</option>

            <option value="https://www.nzherald.co.nz/">New Zealand Herald (New Zealand)</option>

            <option value="https://www.snl24.com/dailysun">Daily Sun (South Africa)</option>

            <option value="https://www.thejakartapost.com/">Jakarta Post (Indonesia)</option>

            <option value="https://www.hindustantimes.com/">Hindustan Times (India)</option>

            <option value="https://www.thestar.com.my/">Star (Malaysia)</option>

            <option value="https://www.straitstimes.com/">Straits Times (Singapore)</option>

            <option value="https://www.bangkokpost.com/">Bangkok Post (Thailand)</option>

            <option value="https://www.japantimes.co.jp/">Japan Times (Tokyo)</option>

            <option value="https://www.scmp.com/">South China Morning Post (Hong Kong)</option>

            <option value="aljazeera.com">Al Jazeera (Qatar)</option>

            <option value="voanews.com">Voice of America (VOA)</option>

            <option value="news.yahoo.com">Yahoo! News</option>

            <option value="news.google.com">Google News</option>

        </select>
        <label for="customWebsite">Or enter a website URL:</label>

        <input type="text" id="customWebsite" name="customWebsite" placeholder="Enter URL">
        <button type="submit">Search</button>

    </form>

    <script src="script.js"></script>

</body>

</html>
Step 4: Add Styling with CSS
- Create a
style.cssfile. - Paste the CSS code below. Again, feel free to change the color of the button and other elements to suit your liking.
body {

            font-family: Arial, sans-serif;

            display: flex;

            justify-content: center;

            align-items: center;

            height: 100vh;

            margin: 0;

            background-color: #f4f4f4;

        }

        form {

            background: white;

            padding: 30px; /* Increased padding */

            border-radius: 10px; /* Slightly larger border radius */

            box-shadow: 0 4px 8px rgba(0, 0, 0, 0.1);

            width: 400px; /* Set a specific width for the form */

        }

        label {

            display: block;

            margin-bottom: 10px;

            font-weight: bold;

            font-size: 16px; /* Larger font size */

        }

        input[type="text"], select {

            width: calc(100% - 20px);

            padding: 12px;

            margin-bottom: 15px;

            border: 1px solid #ddd;

            border-radius: 5px;

            box-sizing: border-box;

            font-size: 16px;

        }

        button {

            background-color: #4CAF50;

            color: white;

            padding: 15px 20px; /* Increased padding */

            border: none;

            border-radius: 5px;

            cursor: pointer;

            width: 100%;

            font-size: 16px; /* Larger font size */

        }

        button:hover {

            background-color: #45a049;

        }
Step 5: Add Functionality with JavaScript
- Create a
script.jsfile. - Paste the JavaScript code below into this file.
document.addEventListener('DOMContentLoaded', function () {

    document.getElementById('searchForm').addEventListener('submit', function (event) {

        performGoogleSiteSearch(event);

    });

});
function performGoogleSiteSearch(event) {

    event.preventDefault();

    var keyword = document.getElementById('keyword').value;

    var site = document.getElementById('websiteSelect').value;

    var customSite = document.getElementById('customWebsite').value;
    // Use the custom URL if provided, otherwise use the dropdown selection

    var finalSite = customSite || site;
    if (keyword && finalSite !== "default") {

        var searchQuery = 'https://www.google.com/search?q=site:' + encodeURIComponent(finalSite) + '+' + encodeURIComponent(keyword);

        window.open(searchQuery, '_blank');

    } else {

        alert('Please enter a keyword and select or enter a website.');

    }

}
Step 6: Load Your Extension into Chrome
- Open Chrome and navigate to
chrome://extensions/. - Enable “Developer mode” by toggling the switch in the top right corner.
- Click “Load unpacked” and select your project directory (
SiteSearchExtension).
Step 7: Test Your Extension
- Click on your extension’s icon in the Chrome toolbar to open it.
- Test the functionality by entering a search term and selecting a website or entering a custom URL, then clicking “Search”.
Step 8: Publishing Your Extension (Optional)
- Visit the Chrome Web Store Developer Dashboard to publish your extension.
- Click “Create new item” and upload a ZIP file of your project directory.
- Fill out the required information (name, description, screenshots, etc.) and publish.
On a note of personal preference and security, I opt not to publish my extensions on public platforms such as the Google Chrome Extension Store. By keeping them for personal use on my PC, I maintain a higher level of security and control over the tools that play a critical role in my daily online activities. This approach underscores a commitment to safeguarding my digital environment, reinforcing the importance of security in our increasingly interconnected world. For those interested in following this path, creating and using extensions locally offers a secure and customizable way to enhance your browsing experience without exposing your digital toolkit to the vulnerabilities associated with public distribution.

Digital Designer, blog writer and also a tech enthusiast.
He loves to write content for blogs, podcasts, design websites, logos, brochures, banners and anything that sends a message to an audience.
You can contact Daniele at the link below:


